Sweet Dreams
Supplies - HERE < link
Font size 36
You will need 1 tube of your choice
Alien Skin Xenofex-Constellation Plugin Filter
Open up my supplies - colourise the frame, paper & doodles from a colour
from your tube
New white canvas 600x600

Copy & Paste the frame as a new layer
Magic wand - click inside all 3 frames - Selections-Modify-
Expand by 2.
Copy & Paste the paper as a new layer - Selections-Invert, click
delete. Move that layer below your frame layer.Select None
Magic wand again - click inside both outer frames - copy & paste your tube
& paste as a new layer - re-size & arrange to your liking. Selections-Invert,
delete. Mirroe your tube, Copy & Paste as a new layer, resizing & as before,
you should still have the Invert,click delete.
Move both tube layers below your frame layer.
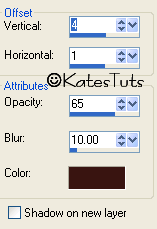
Back to your frame layer - give it a drop shadow as below
Have your top layer active, Copy & Paste your tube & place to your liking.
Give the tube layer the same drop shadow as before
Cross the eyes out on your bottom layer & merge visable all other layers.
Resize your merged layer 85% Bicubic - all layers unticked
Have your bottom layer active - Copy & Paste Doodle-2 as a new layer, arranging it
to the left, Duplicate & Image - Mirror.
Copy & Paste Doodle-1 as a new layer - Image - Flip, arrange it to your liking
Once again, cross eyes out on bottom layer, merge visable all other layers.
Resize this time 90% Bicubic.
Add correct copyright ©
Now it's time to add your text & name
Once your have done that, duplicate the text layer 2 times to to give you 3 text layers.
Cross out the eyes on your 2 top layers making original text layer active.
Go to Effects- Alien Skin Xenofex-Constellation with these settings
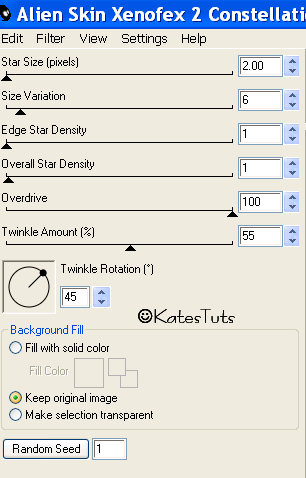
Continue with other 2 layers clicking the Random Speed each time
Click your Crop Tool & crop around your tub.
You may have to resize - if so, have All Layers ticked this time.
ANIMATION
Cross out eyes on 2 top layers of text making your original text layer active,
Copy Merged - go to your Animation Shop & Paste as a New Animation.
Back to your PSP, cross out eyes on original text layer, make next layer active
& uncross the eyes on that layer, copy merged - AS Paste After Currant Frame.
Back to your PSP, do the same as above then go to AS & Past after Currant Frame once more.
Save vas a *GIF*
This tutorial was written by ©Kate on 3rd September 2009.
Any resemblance to any other tutorial is purely coincidental.
You may Link to this tutorial, and/or print for your personal use only.
Please do not copy, rewrite, translate, place it (or Zip files)
anywhere on the web, send via email, or claim it as your own.


Comments
Post a Comment